I mentioned shooting in "RAW" in the last blog and it is still too early to discuss this topic. However, basically it means that instead of recording my image in a format like JPEG that will display as a photograph, I am only recording data and use post-processing software to adjust settings after capture instead of before. This RAW data file is not a photo and has to be converted to a viewable image in a format such as JPEG (compressed) or TIFF (uncompressed). So, instead of the camera processing the captured light into a photo, when shooting in RAW you are recording the captured light as data with minimal processing so that you have complete control after the fact. That's all I'll say for now.
But as it relates to WB, I have my camera set to neutral so I can set the white balance after capturing an image and not either tell the camera what setting to use before shooting or use the AUTO WB mode to let the camera decide itself. I am very particular about white balance. I find that the AUTO WB setting makes the images too WARM (yellow-shifted) for both my taste and as an accurate representation of what I saw in natural light, and that Lightroom will make the images too COOL (blue-shifted) if I select its auto color balance function. Again, WARM shifts the color towards yellow, whereas COOL shifts the color towards blue. I err slightly to the cool side, but want a realistic color and usually I adjust the color balance based on the background rather than the spider to try to achieve a more natural color cast.
Color temperature is measured in degrees Kelvin. Remember this odd measurement from chemistry class? Don't worry you don't need to learn it now or recall chemistry or physics. All you need to know for now is that we care about color temperature due to the lighting of our subject. If you are shooting under fluorescent lights your images will be affected, often negatively. If you are shooting under natural light or tungsten lights or whatever ... it affects your color balance. So does natural daylight or sunlight. Your camera's AUTO WB will do its best, but by shooting in RAW and neutral WB I strive to make it perfect in post-processing. The image below shows the color balance of various light sources. I am using electronic flashes almost 100% of the time and my most frequent adjustment is to about 4800-5200K. However, you will see how wide the range of available light in a room or outdoors can be. Confusing? Have you ever bought fluorescent tubes at Home Depot? They have the color temperature such as 4000K printed on their boxes. You will find some that may be 5600K as this more closely approximates natural light. Many people gravitate to those and they make for a healthier office environment than the typical "BLUE" cast of generic bulbs.
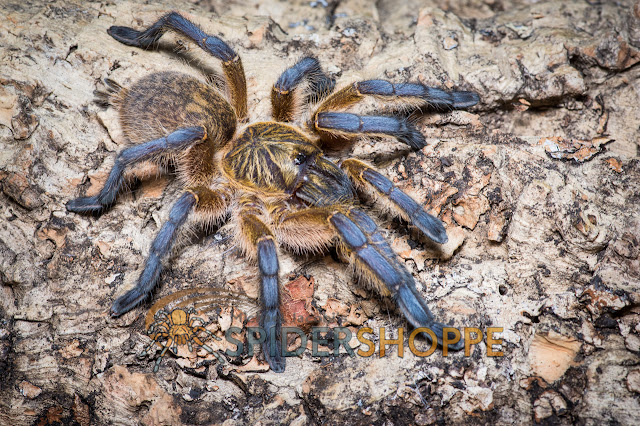
Remember yesterday's aperture examples with the Harpactira pulchripes. As I wrote, I just used my camera's JPEG setting to capture image files as processed by the camera. WB was set to AUTO. The resulting images were a bit washed out and too warm for my liking and did not accurately represent either the spider's color or the color of the cork bark background. Because the spider is golden yellow the images definitely had too much of a yellow cast and the blue-grey legs showed up as just grey. Now I've taken the same image captured in RAW and processed it in Lightroom. The color balance was set to 4524K, a bit lower than I usually go but it most accurately represents the colors I saw. Additionally, I added a slight increase in both clarity and vibrance and used a preset I have made to adjust the highlights and shadows. Additionally, I cropped the image for better composition. Instead of the spider being smack dab in the middle it more closely follows the "rule of thirds" and has space in front of it to suggest its movement. This is the type of tarantula portrait that I post publicly. Again, this shot was at f/18, 1/60 sec, and ISO 100. It was recorded as a RAW (data only with minimal camera processing) file and then "developed" in Adobe Photoshop Lightroom CC as detailed above.
 |
| Harpactira pulchripes, subadult female © Michael Jacobi, exoticfauna.com |
Compare the above beautiful portrait of a spectacular spider shot in RAW and cropped and post-processed with white balance, exposure, clarity, shadows and highlights adjusted, etc. to the exact same shot recorded as a JPEG with its unnatural yellowish cast and washed out overexposed look.
 |
| Exact same photo as above shot as a JPEG with auto white balance that rendered unnatural color. |
In closing, Chad "advan" Campbell is well-known for his spectacular photography. He texted me this morning to tell me that he has some info he'd like to add to my first Photography 101 post about aperture. He was going to post as a comment, but I want everyone to see it so I asked that he send it via email so I can post it as a blog entry.
This brings up something that I have meaning to mention ... KISS MY BIG HAIRY SPIDER is turning out to be almost a magazine with single articles several days a week. I welcome submissions and may print your writings as a "guest blogger". Just email me at spidershoppe@icloud.com if you are interested in contributing.
Thanks for reading my words, MJ


2 comments:
hmmmm guest blogger you say.....hmmmm
Apple
I did. If you want to guest blog just write it up. I will take editorial liberties to rewrite it and then post as your own featured guest blog.
Post a Comment